How to Repair the Seat in a Cane Chair
by Guest Post on May 25, 2010
For the handy do-it-yourself homeowner, repairing the seat in a cane chair is a task that can be completed relatively easily with some basic instructions. However, for those who do not excel in-home repairs, crafts or do not enjoy doing such activities, it may be wise to outsource the repairing of a cane chair. Cane chairs are usually quite comfortable and can last from generation to generation. The six steps below describe the basic process for repairing a cane chair.
Having the right tools is an essential part of successfully repairing a cane chair. Gather needle nose pliers, a screwdriver, a cane straightener, and a pair of tweezers. Choose a cane that is the same size as is currently in the damaged seat for the best fit.
Step 1
Remove all the old cane from the chair seat. Be sure the holes are free of dirt and debris to make the re-caning process easier.
Step 2
Place several canes in a water/glycerin bath to soften them for installation. Then string the chair from front to back, keeping the cane loose and straight.
Step 3
Run horizontal strips through the side holes and across the vertical cane.
Step 4
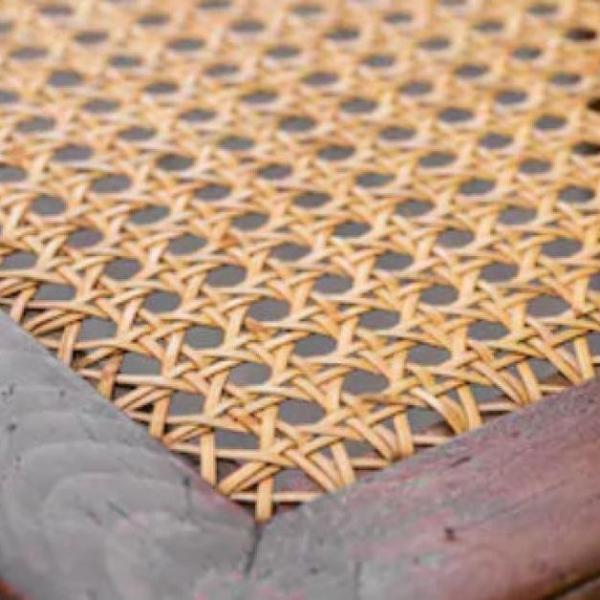
It is time to begin weaving the cane. Working with the second set of vertical canes, run the pieces under and over the horizontal strips (i.e. - under the first, over the second, under the third, etc.). Repeat for the remaining vertical holes. For the horizontal holes, begin running the cane over and then under the vertical pieces. Continue for the remaining holes. Straighten all cane once woven in. This step is the most time consuming of all the steps.
Step 5
Step 5 works the cane on the diagonals. Start from any corner that is easy to work with and run the cane at a straight diagonal. Weave over the vertical pieces and under the horizontal pieces. Continue this pattern for all the diagonal holes. Be sure that the cane is being strung through the correct holes before continuing with the rest of the chair.
Finish the diagonals by working the next set of strands in the opposite manner. Run them under the vertical pieces and over the horizontal ones. A natural "x" will form in the pattern. Use care when slipping these final pieces into place, making sure that the cane sits neatly within the space of the cane that has already been woven.
Step 6
Finish the chair with a cane border around the outer edges. This will help provide a polished, finished look while making sure that the cane sits flat on the chair.
A novice caner can expect to spend a few days repairing a chair, whereas, an experienced caner can have a chair repaired in about a day. Seek out the advice and hands-on help of friends and family who have repaired cane before if questions arise. Taking the time to properly repair the seat in a cane chair will ensure that it lasts for many years to come.
Popular Articles
Three Places to Spend Money on the Exterior of Your Home
When you have the exterior of your home remodeled, you are investing, time, energy and convenience into the project and you want to make sure that...
98817 Views
Homemade Headboards-Make an Upholstered or Wooden Headboard
Homemade headboards can add a lot of personality to any bedroom. They can be coordinated with existing furniture and room decor or they can be the...
75219 Views
When to Use a Brush, Roller or Sponge Brush
Brushes are a good choice for painting trim and woodwork. They are also useful for cutting in the edges around the top and bottom edges and corners...
72285 Views
Creating a Cottage Kitchen with Bead Board
Kitchen decor can range from modern and bold to elegant and elaborate by using strategic kitchen pieces. One of the most popular decorating trends...
53630 Views
Gas Fireplace Diagnostics and Troubleshooting
Follow these steps for diagnosing and troubleshooting Gas Fireplaces repairs. For the average DIYer, this may seem intimidating, depending on the...
31016 Views
Latest Articles
How Much Does It Cost To Take A Bath?
Plumbers know that a bath may seem like a relaxing luxury, but the real cost extends far beyond your water bill. The average soak uses 35 to 50...
on Apr 8, 2025
10 Concrete Patio Ideas on a Budget
A concrete patio can be a game-changer for your outdoor space. It is durable, versatile, and can be customized to fit your style. But what if you...
on Mar 25, 2025
Tips for Creating a Stunning Personalized Photo on Canvas
Order the unique beauty of a personalized photo on canvas and bring your memories to life. With a customized photo on canvas, you can transform...
on Mar 7, 2025
Best Areas to Buy Property in Singapore for Long-Term Growth
Singapore's real estate market remains one of the most stable and lucrative in the world. With limited land supply, strong governmental...
on Feb 18, 2025
Troubleshooting Excess Water in Your HVAC Secondary Condensate Drain Pan
When maintaining your air conditioning system, it is easy to overlook the condensate drain pan - until excess water starts pooling in places where...
on Jan 12, 2025
Featured Articles
What Type of Licensed Contractor Should You Hire?
on Feb 28, 2017
Hire Contractors / Estimates

Looking for a specialty project? There are many types of contractors available for your home improvement needs. Finding the right type of...
Sponsored Articles
Best Areas to Buy Property in Singapore for Long-Term Growth
on Feb 18, 2025
Real Estate / Finance

Singapore's real estate market remains one of the most stable and lucrative in the world. With limited land supply, strong governmental...
Actions
Top Categories
- Garden / Landscaping / Patio — 264
- Kitchen / Bathrooms — 240
- Real Estate / Finance — 203
- Appliance / Repair — 186
- Interior Design / Decor — 184
- HVAC / Air Conditioning — 148
- Cleaning / Maintenance — 144
- Improvements / Remodeling — 131
- Plumbing / Basements — 118
- Floors / Tile / Hardwood — 116
- Doors / Garages — 113
- Safety / Security — 113
Articles Archive
More DIY Articles
Repair or Replace: How to Choose an HVAC System
Your home's HVAC system has probably become a reliable part of your household. Whether you're cranking up the heat in the winter or sitting in the...
Removing Water Rings or White Haze from Wood Furniture
Water rings which appear as filmy gray spots are especially common on furniture from not using coasters. Try one of these methods to remove the...
Landscape Designer vs. a Landscape Contractor - Part 1
Whether you have a small backyard or an acre estate, the right landscape plan can create an outdoor masterpiece. Starting with a professional...
The Strangest Things Ever Found in Storage Units
Many of us make use of some extra storage space at some point or another, maybe because we are in the middle of a move or carrying out a home...
Tile Reglazing vs. Tile Replacement
Do your bathroom tiles look old and stained? Are they peeling, chipping or appearing dull? Is the color of your tile out of style or boring? If so,...